Sparkles and Shoes

A Fashion, Travel, and Lifestyle Blog

  • Home
  • About
    • Contact
  • Fashion
    • My Style
      • Spring Style
      • Summer Style
      • Fall Style
      • Winter Style
    • Really Love My …
    • Shop My Instagram
    • Style Icons
    • Trending
  • Travel
    • Africa
      • Egypt
      • Kenya
      • Morocco
      • Southern Africa
      • Tanzania
    • Asia
      • Indonesia
      • Qatar
      • Russia
      • Singapore
      • Turkey
    • Europe
      • Austria
      • Belgium
      • Croatia
      • Cyprus
      • Czech Republic
      • Denmark
      • England
      • Finland
      • France
      • Germany
      • Greece
      • Hungary
      • Iceland
      • Ireland
      • Italy
      • Monaco
      • Netherlands
      • Norway
      • Poland
      • Portugal
      • Romania
      • Russia
      • Scotland
      • Spain
      • Sweden
      • Turkey
      • Vatican City
    • North America
      • Canada
      • Caribbean
      • Central America
      • US: East Coast
      • US: West Coast
    • South America
  • Lily Harper
  • Favorites
    • Beauty
    • Delicious Eats
    • London
    • My Wedding
    • Sparkle Sessions

Tips for Learning to Shoot on Manual

02/01/18 | photography

Tips for Learning to Shoot on Manual

As someone who has had a DSLR for more than a decade I would say only within the last two months have the majority of my photos been taken on manual mode.  Embarrassing, yes I know, but you have to start somewhere.  For me auto was just so easy and the pictures always turned out well so why mess with it?  Well the answer is because that good picture could be great if you spent a minute making it better.   It started with my trip to LA where my friend Dave not only gave me crap but then also encouraged me to start shooting on manual and taught me a few tricks.  Well since then I have read up on the subject and today want to share a few of my key findings with all of you:

(1) Chose a Focal Point:  What is the point of this photo?  A human? A tree?  A flower?  Decide what you want to be the main focus and don’t try and have two.

(2) Pick an Aperture.  The aperture is the hole at the center of your camera’s shutter, also known as your f-stop, and it is your way of adjusting the amount of your picture that is in focus. As a rule of thumb the lower the f number the more of your background is blurred and the higher the number, the more is in focus.

(3) Adjust the Shutter Speed.  This is the amount of time you are asking your camera to pick up light and measured in fraction of a second.  A lower shutter speeds let in more light, but make your image susceptible to blur which usually requires a tripod (think the Northern Lights) and a  faster shutter speeds let in less light but often results in a sharper photo. 

(4) Pick an ISO setting:   I like to think of ISO  as your camera’s reaction to light – most DSLR’s have a range of  200 to 1,600.   As a general guideline, if you are shooting outside on a sunny day a good ISO range would be 100-200 is and if you are indoors with dim lighting 800-1600 range is a good range for your ISO.   For low light, be careful though the higher the ISO the better the quality of the photo but also the higher chance the background will be grainy. 

And a few notes:  

  • When starting out try to shoot an inanimate object, for a beginner shooting a moving subject can be quite frustrating! 
  • Plan on taking multiple shots – part of the reason i advise people get large memory cards 
  • Try on shoot during golden hour  (see below) 
  • Think about the triangle at all times; aperture, shutter speed, and ISO, they all play off of each other.
  • A good tripod is key – I bought this 57” Ultra Compact and Lightweight Aluminum Tripod for Paris and it is the best one I’ve ever used.
  • Remember the rule of thirds – divide your view into three sections horizontally and three sections vertically, from there decide where you want the focal point to be, ideally along one of the lines or intersections of those lines. 
That is a lot of words so what do I mean by this?  Often when working with manual I get a photo that is too bright and then too dark and then just right – for example these were taken in November when I was in Iceland.  For example see two nearly identical photos below taken with the same settings just a different ISO resulting in one that is too bright and one that is too dark.  Too Bright  (ISO 1600, 24 mm,  F 8, 1/160) and the too dark version (ISO 400, 27 mm,  F 8, 1/160): 
 Shooting on Manual - Too Light and Too Dark
 

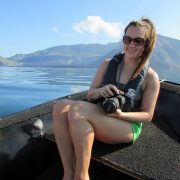
Then to get it just right it was not just changing the ISO but every other setting too and as the sun began to rise it was hard with the shifting light but ultimately I am really glad with how it came out (Final Settings: ISO 200, 27 mm,  F 5.6, 1/80) which resulted in my changing both my ISO and my shutter speed: 

Shooting on Manual - Correct Settings

To sum up all these tricks and since I know many people are visual learners take a look at these two cheat sheets / diagrams from the Digital Photography School do a great job of visualizing what you are trying to go for! 

Digital Photography School Cheat Sheet Shooting on Manual - ISODigital Photography School Cheat Sheet Shooting on Manual - Aperture
 
Additionally, I try and shoot during golden hours.  This is the hour after sunrise or the hour before sunset.  As a general rule of thumb, if your shadow is taller than you are, it is a great time to be shooting.   For example, my shadow is about 20 feet tall in this fun selfie / shadow shot from Eyjafjallajo?kull, Iceland below?  Why so many photos from Iceland, you may ask?  Well, I have thousands of what I would like to think are good ones I have yet to share and it was a trip by myself which allowed me to really play around with my camera and not be rushed by anyone else! 
 
Shooting on Manual - Golden Hour in Eyjafjallajökull, Iceland
 
Now I said before, I shoot manual more than 50% of the time now and that is because it takes me a good while to set it up and usually my subjects are not that patient so auto it is.  (Also why all of my example pictures are landscapes) So next up, get good enough it only takes a few seconds and use manual all the time!

Do you shoot in manual?


Signature

Subscribe

« Currently Trending: Merlot Wine
A Pop of Hunter Green »

Related Posts

  • Hiking in the GalapagosHello From the Equator!
  • The Lake in Central ParkAn Afternoon in Central Park
  • The Cape’s Best Scallops
  • Nick Brandt - Wildlife Photographer - LionessesDo You Know Nick Brandt?

Comments

  1. Cindy says

    February 2, 2018 at 3:15 pm

    Your photos in your bolg and Insta accounts are so fantastic and now I know why. There is a lot more to take a great photo that just pointing and shooting. You are inspiring me to learn a bit more. Thanks.

  2. Setarra says

    February 1, 2018 at 3:50 pm

    I honestly only started shooting manual in the last year and a half and it’s made such a difference with my photos. These are great tips Kelly!

  3. Allie says

    February 1, 2018 at 9:46 am

    These tips are so helpful! Thank you! I’m just starting out trying to get better at photography and any and all advice is appreciated. You also explain things very clearly! xAllie http://www.theallthatglittersblog.com

  4. Jessica says

    February 1, 2018 at 9:44 am

    You make it look so easy… I will have to try some of these suggestions and I do know what you mean about the sun. Sometimes those pesky shadows or people squinting into the sun is so annoying.

  5. Molly says

    February 1, 2018 at 8:36 am

    Great suggestions and what a difference. I am going to have to play around with these tips this weekend on my trip. I will let you know how it goes…

Hi, I am Kelly and welcome to Sparkles and Shoes, a fashion, travel, and lifestyle blog founded in 2012.  After six years of living in London I am back in New York with my husband and two littles! 

  • Bloglovin
  • Email
  • Facebook
  • Instagram
  • Pinterest
  • Twitter

Search

Newsletter

WHERE I SHOP

Amazon

Anthropologie

J. Crew

Minted 

Sephora

Target

Walmart

Zappos

Archives

  • 2025
  • 2024
  • 2023
  • 2022
  • 2021
  • 2020
  • 2019
  • 2018
  • 2017
  • 2016
  • 2015
  • 2014
  • 2013
  • 2012

Fine Print

Sparkles and Shoes is a part of several affiliate advertising programs. This means that if you click and/or make a purchase through certain links on this site or any related social media platforms (including Twitter, Facebook and Pinterest), I may make a commission from that click and/or purchase. All opinions are my own.

© Kelly Donlin and Sparkles and Shoes, 2012-2022 Unauthorized use and/or duplication of this material without express and written permission from this site’s author and/or owner is strictly prohibited. Excerpts and links may be used, provided that full and clear credit is given to Kelly Donlin and Sparkles and Shoes with appropriate and specific direction to the original content.

Get the latest

Receive Sparkles and Shoes right to your inbox!

Connect with me

  • Bloglovin
  • Email
  • Facebook
  • Instagram
  • Pinterest
  • Twitter

Copyright © 2025 · Designed by High Note Designs, LLC

Copyright © 2025 · Tasteful Theme on Genesis Framework